A coworker asked in a panic if I could create a dinosaur cake for her 5 year old son's birthday.
I couldn't pass up the challenge so here it is, step-by-step:
You will need to make two double layer Dino cakes:
two nine inch cake pans
frosting spatula (this will change your life)
4 cake mixes and listed ingredients from box
6 cans of frosting
neon food coloring
whoppers, chocolate disks, gummy eyes
1. Bake the cakes. Each mix works for two pans.
2. Cool, wrap and freeze
3. Carve each cake into a body, tail, and head. The first round needs to be cut three inches off the bottom and cut into a horseshoe to create body. The 2nd round can be trimmed into a tail and head to the shape of your liking.
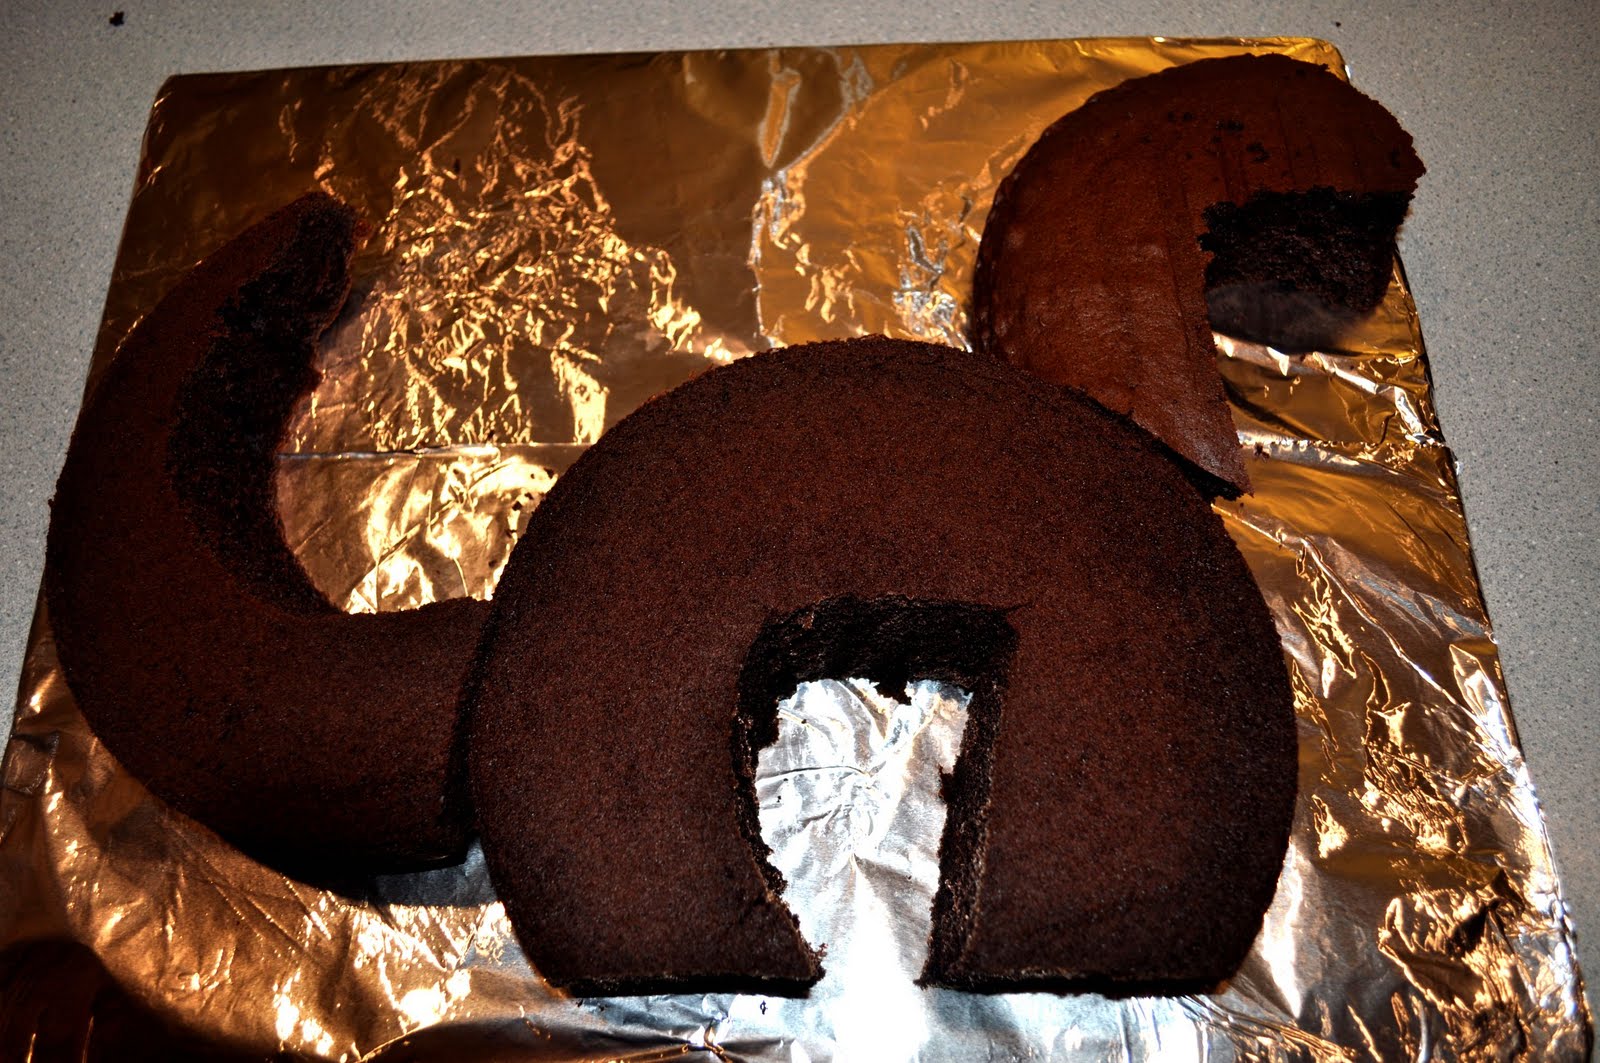
4. Glue to display board with frosting
5. Layer cakes with frosting, use skewers to "dowel" weak areas (trust me, otherwise Dino-decapitation can occur)
6. Crumb layer with frosting (put a thin layer to keep the crumbs from interfering with the final frosting), freeze for 30 minutes
7. Complete Frosting keeping it as smooth as possible
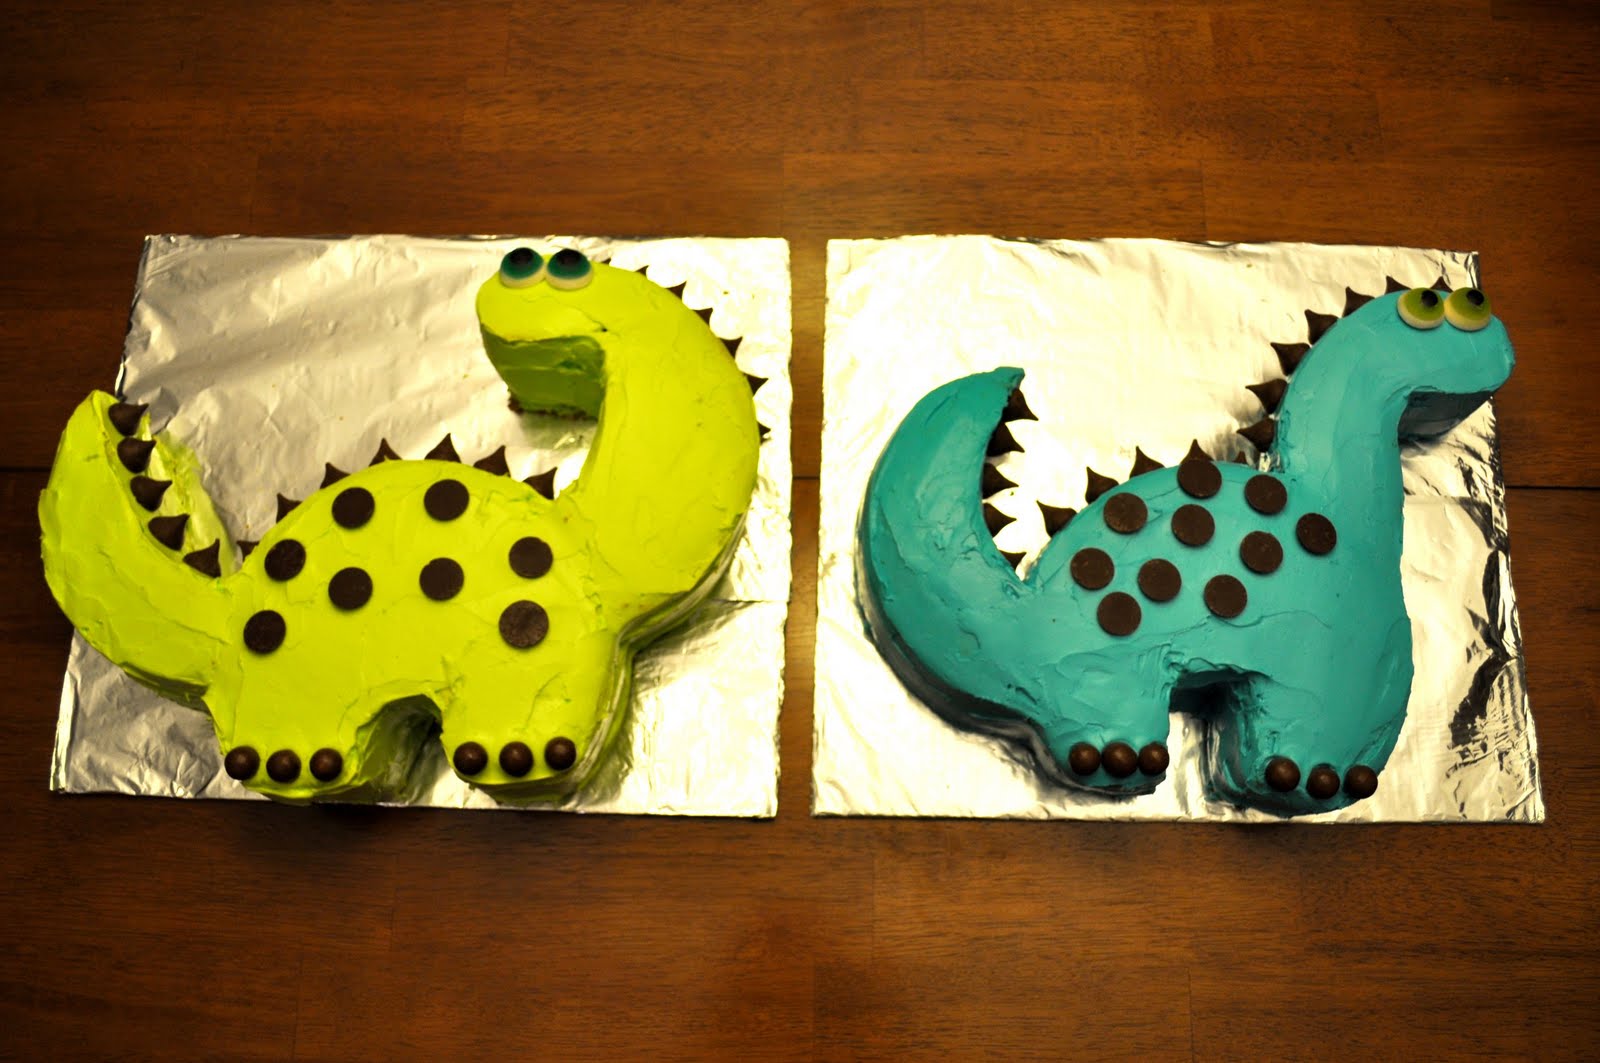
8. Place three Whoppers at feet for toes, chocolate disks for spots, Hershey kisses for spikes, and gummy eyes
Tada! Inexpensive, super-cute and perfect for those little kiddos who love Dinosaurs!
Saturday, August 28, 2010
Saturday, July 17, 2010
My Favorite Dish
This Salad Costs less than $7.00 to make and is perfect for a BBQ side dish.
Ingredients:
Can of Sweet Kernel Corn
Can of White Kidney Beans
Can of Red Kidney Beans
1 Medium Lime
Bundle 'o' Cilantro
Rinse all ingredients in cool water
Chop Cilantro
Mix together in a big bowl
Cut lime in half, and squeeze juice over salad
Mix, Refrigerate and enjoy.
Saturday, June 19, 2010
Adventures in Home Ownership
Our deck was considered completely unsafe; dry rot, rusted nails, and no bolting to the house. It had to be replaced. So when we were getting married last summer we requested in lieu of a registry, that people help us fund for our home projects-mainly the deck. So after the wedding madness, the typical Northwest weather came in and we couldn't build.
Kevin and I took our tools out this month and took down the old rickety deck and had a work party made up of friends and family to help us. This all happened in one week from destruction of the old deck, to the final railing on the new deck.
Before: (no railings as they were taken down over a year ago)
Destruction- We managed to save all of the old wood (except for the most dry rotted) It will most certainly be reused in other "old west" dog houses, planter boxes and general woodworking my husband thinks up.
Lots of Nails, lots of wiggling.
Here is the dry rot....so dangerous. Your foot would step right through.
No more deck poorly connected to the house....
Only one major injury... hammering your own hand results in a lot of swelling and a big fat bruise....
To my surprise, no injuries with this part, had to bust out some concrete to set our pillars.
There was staining....a of staining. I spent every day after work staining all of the wood so it would be gorgeous when it went up. It paid off.
Then the troop came out... there was some man talk, some beer drank and the deck went together piece by piece.
Kevin and I took our tools out this month and took down the old rickety deck and had a work party made up of friends and family to help us. This all happened in one week from destruction of the old deck, to the final railing on the new deck.
Before: (no railings as they were taken down over a year ago)
Destruction- We managed to save all of the old wood (except for the most dry rotted) It will most certainly be reused in other "old west" dog houses, planter boxes and general woodworking my husband thinks up.
Lots of Nails, lots of wiggling.
Here is the dry rot....so dangerous. Your foot would step right through.
We then disconnected the whole structure from the house, which was relatively easy- it was only nailed to the siding (no bolts). We simply wrapped the deck with a utility rope and pulled, hoping it wouldn't crash into our sliding glass door.
Only one major injury... hammering your own hand results in a lot of swelling and a big fat bruise....
To my surprise, no injuries with this part, had to bust out some concrete to set our pillars.
There was staining....a of staining. I spent every day after work staining all of the wood so it would be gorgeous when it went up. It paid off.
Then the troop came out... there was some man talk, some beer drank and the deck went together piece by piece.
Then the beautiful railing was put up. It is my favorite part. It is safe, functional, and looks so nice.
The final product is exactly what we wanted. We spend as much of our time out there already.
Wednesday, May 12, 2010
Screen Printing should be one word...
I still find myself blending the two words into one verb of fantastical possibilities..... Anywho....
I have started back up with the Yudu today due to a needed day off and some killer joint pain in my feet....no work, just screenprinting.... see one word......
I first needed a new screen since the two I have are already burned and have great
First step is to wet the screen. I have found that a wet (but not dripping) paper towel works best. The thicker the better. When the screen is wet, put the dull side (shiny side is the plastic covering) of the emulsion sheet down onto the flat side of the screen (or the side that is flush on all corners, trust me, I've screwed this up before.... make sure there are no airbubbles, or light green spots, these are enemies....
Then comes the drying. One push of the button simply does not do it. Three times and a hairdryer on low cool heat works best. Be sure that it is dried completely. If there are any tacky parts to the emulsion its just not dry...DO NOT PEEL the plastic back if it is tacky...
While drying- print off or draw your design on the the transparencies... silhouettes made of paper are also cool...the TimberDog design
Once the emulsion is dry place the designs print side up on the glass, then the flat side of the screen down.... EXPOSE.... not yourself.....the screen....
The green emulsion sheet will turn blue. Where the designs lay, it should be green....wash gently. I usually put the whole screen into the shower,
Once the designs are no longer green, and the green is down the drain...dry... again.... three times and a hairdryer.
Then comes the fun part, tape off the design you want to print (or just the sides if you went with a full page design).... Make sure everything is centered.
It can prove difficult when doing c
Slightly lift the screen and put a stream of ink directly above the de
Lower the screen and pull with more pressure to press ink onto the fabric. Hold the fabric in place when lifting the screen up again.
Saturday, April 24, 2010
Blind Quilting
I am a self-taught seamstress of sorts. I followed the advice of Whit a few years ago and purchased a $50.00 Brother Sewing Machine and some good scissors...
What has blossomed are many adorable custom fit shirts, christmas stockings, three sets of curtains still in use, original purses by Oertli Original (thanks Katie) and one finished photo quilt. Now today I am going back to the Brother to whip up a family photo quilt for Kevin's Grandma for Mother's day. She is the ultimate Super Mom.
Here is the first I made for my own Grandma at Christmas.
...
I have no idea why this photo is sooo small...
Anyway, I have started from scratch again w
ith 9 photos printed in sepia onto printable fabric sheets 8x11 (found at JoAnn for 5 bucks for 4 sheets) Most are group photos from over the years...
I Then bought a bundle of 5 fat quarters and a couple extra stray colorschemed quarters (about 10 bucks from JoAnn) and cut them
into the following: 2- 3"x16" strips for the sides of the photos, and 2-3"x12" stips for the top and bottom of the pictures to creat the "frame" of the photo.
My tools of use and luxury-
rotary cutter and mat
measuring guide
fabric/thread
pins
and of course the brother
iron with ironing board
PATIENCE...
Of course this quilt is a work in progress, will update once complete...
...well the day has come and the quilt is finished. This took about
6 hours to complete, but stretched out over a week or so, it goes pretty easy.
The Finished product....
Here is the first I made for my own Grandma at Christmas.
...I have no idea why this photo is sooo small...
Anyway, I have started from scratch again w
I Then bought a bundle of 5 fat quarters and a couple extra stray colorschemed quarters (about 10 bucks from JoAnn) and cut them
My tools of use and luxury-
rotary cutter and mat
measuring guide
fabric/thread
pins
and of course the brother
iron with ironing board
PATIENCE...
Of course this quilt is a work in progress, will update once complete...
...well the day has come and the quilt is finished. This took about
The Finished product....
Wednesday, April 21, 2010
New Hobby

With the new changes, always comes a bit of creativity. I have started to put my screen printing set up to good use. Check out my Esty shop ShareABitOfLove if you get a chance, pretty bare for now, but as I get going more will be added. I adore simple clean design with a personal touch.
My first item is a silhouette of our sweetie pie Timber....
Wednesday, March 17, 2010
Travel
I adore airports. I am first to volunteer to take ANYONE to the airport. I love the coming and going-business, vacation, reuniting, and departures. LOVE airports. I have had a very blessed life in travel, I usually get a couple trips per year. This one happens to be from Whit- for her birthday. This girl is flying me out for HER birthday. I am just so lucky.
I am sitting in Seatac Airport at 9pm- people watching, listening to the subtle sounds of voices, ventilation systems, announcements. The lighting is pretty mellow, and there are the occassional soft sofa like benches that I have managed to hog. Lets hope that the seat next to me is empty, perfect for putting my feet up and sleeping. Its a long trip from one coast to the next. I managed to bring some tunes and my newest project to allow myself to crochet mindlessly. I of course had to ask my airline savvy aunt if a crochet hook would be allowed... FYI totally is...
Here's to the next four days of spud buds reuniting... I plan to spill out the story of Whit and Monica in the future.....
Subscribe to:
Posts (Atom)